Workflow Engine Component
Summary
It is responsible for managing the deployment, execution and management of the different workflow instances. It will be multi-tenant leading to executing a workflow instance on behalf of one organisation by also taking care of the corresponding workflow and organisation data level. This component will expose:
- A graphical user interface for interacting with the different actors involved in the lifecycle of a workflow
- A REST API interface allowing programmatic access to the different types of functionalities offered.
The main functionalities are:
- Deploy/redeploy a workflow in the workflow-engine, instantiate it and execute it.
- Manage and follow the workflow instances, according to the workflow description in BPMN.
- Interact with manual tasks of the workflow.
- Manage the workflow engine environment.
Moreover, the executable workflows are designed by the integrated Editor Workflow based on the abstract workflows. Their design has to be aligned with the workflow engine, since the standard BPMN2.0 doesn’t reach the complete execution definition and it is allowed to extend it in order to cover the whole execution through this workflow definition. As the deployment will be executed on the cloud, it is mandatory to define dynamically the self-contained executable workflows, which are included in the BPaaS bundle, following these standards.
The main roles to interact with the functionalities are:
- CloudSocket Customer, who wants to use the purchased BPaaS bundles, which has been deployed automatically in the cloud. The customer can interact via the use of different roles: i) Knowledge Worker is responsible for managing the manual task of the workflows; ii) Process Responsible (technical skills) is in charge of dealing with the workflow engine, managing the workflow instances and following their status.
- Broker, who is responsible for the configuration of the Workflow Engine, for performing tasks on behalf of customers (e.g., workflow instances actions), for inspecting/monitoring the status of all workflows deployed and especially the status of respective SLAs.
- Platform operator, who may be the broker itself, and is responsible for checking if the Workflow Engine works as expected.
Additionally, there is a role that covers the functionalities for creating the executable workflow, which will be included in the BPaaS bundle, during the design phase. Therefore, this role is not directly related with the execution phase, but the internal component is completely integrated with the whole component.
- Workflow Designer, which is responsible to design the executable workflows using the executable workflow editor in order to include the necessary information to transform the abstract workflows (independent of the workflow engine) to the executable workflows (associated to a specific workflow engine).
All the actors will interact directly with the graphical user interface and the system will manage automatically the authorization of the appropriated functionalities (see the user guide in the Manual section).
The following table indicates the details of the component.
| Type of ownership | Extension |
| Original tool | FIWARE and Fed4FIRE project |
| Planned OS license | Apache License Version 2.0. |
| Reference community | Activiti community |
Consist of
- Web UI of workflow Engine (Graphical User interface)
- Workflow Engine (core functionalities)
Depends on
- Process Data Mediator Engine
- IdM Marketplace
Component responsible
| Developer | Company | |
|---|---|---|
| Roman Sosa Gonzalez | roman.sosa@atos.net | Atos |
| Joaquin Iranzo | Joaquin.iranzo@atos.net | Atos |
Architecture design

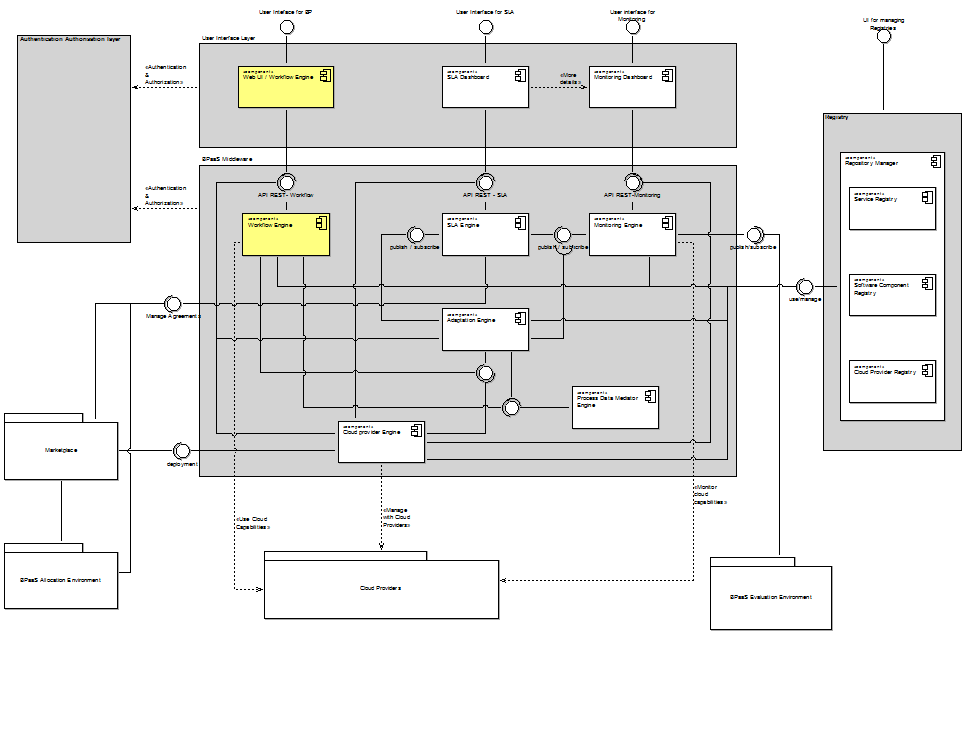
Figure: General architecture for Workflow Engine
The general architecture of this component can be viewed by checking the components coloured in yellow, in above figure:
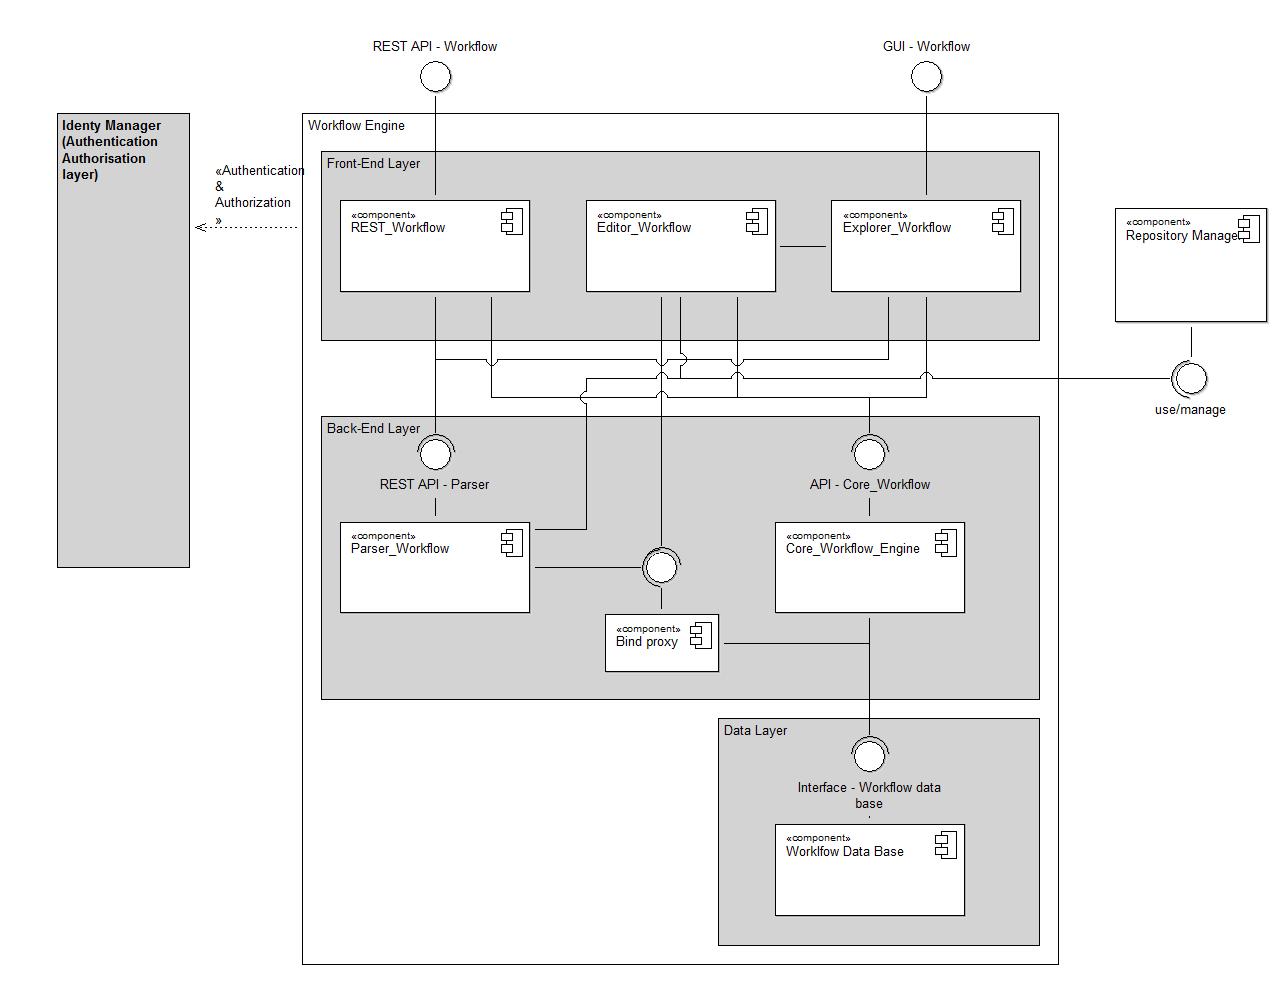
The below figure introduces in more detail the different modules of the Workflow Engine. The components are split into two main parts: i) one part is responsible for exposing the interfaces with the externals actors (other components, BPaaS Customers or Brokers); ii) the other is responsible for managing the business logic and the data layer.
The two layers allow decoupling the components between the presentation layer, which is directly related to the exposed interfaces (Graphical user interfaces and REST API) and the backend, which is responsible to provide all the functionalities and their persistence. Thus, the interface layer will focus on the look and feel or how to expose these interfaces; moreover it will manage the necessary calls to the backend layer, which will execute the actions.

Figure - Internal architecture for the Workflow Engine.
Front End layer:
- REST Workflow module is responsible for exposing all the functionalities of the Workflow Engine through a REST API, allowing other components to interact with the engine programmatically, without human interaction. The main interactions are with the Cloud provider Engine, which is responsible to orchestrate the deployment of the BPaaS bundle in the cloud environment, and the Adaptation Engine, which is responsible to modify the environments and the currently running workflow instance in order to cover the new conditions.
- Editor Workflow module is responsible for the editing of the executable workflows at the design phase. A graphical user interface is used for editing, modifying and generating the executable workflows, while the involved actors are the technical designer, who can be contracted by the brokers to take care of the workflow design task. However, the module cannot interact directly with the customers and their companies; it is thus exploitable only by brokers. Nevertheless, this editor is necessary to align the definition of the concrete workflows with the technology adopted in the workflow engine in order to deploy and execute them correctly in the cloud environment.
- Explorer Workflow module is responsible for exposing a graphical user interface in order to interact with the human actors, such as brokers and customers. Hence, through this exposed dashboard, the different actors can manage the complete lifecycle of the deployed workflows, allowing interacting with the platform in an easy way, increasing the quality of experience (QoE).
Back End Layer
- Core Workflow Engine module is responsible for managing all the functionalities of the Workflow Engine. Hence, the complexity of the business logic of all these functionalities is delegated to this module and an interface is exposed to interact with them. It is also responsible to interact with the data layer and to persist the workflow, its instances and the rest of the entities.
- Worflow Parser module is responsible for managing the functionalities related to workflow parsing, such as the introduction of the real endpoints of the software components and the automatic generation of the service task tags to invoke WS and RESTFul services.
- Bind Proxy is a small module to facilitate the interaction with the database. It is responsible for managing the binding between service tasks and the associated services. It has been introduced to avoid using the Core Workflow Engine module as a proxy, to only connect with the database in order to manage the binding actions. In this manner, using this module, the Workflow Parser is decoupled from the Core Workflow Engine.
Data layer
- Workflow Data Base module is responsible for persisting all the data in order to support all the functionalities. The model definition is based on an entity-relationship schema to represent all the entities, including tenants, roles, workflows, instances, jobs… It exposes a standard interface to connect with the data base; nevertheless it is not its responsibility to create an Object-relational mapping to interact with the entities such as JPA in java or SQLAlchemy in Python, since that is delegated to the Core_Workflow_Engine and the Bind_Proxy to provide it.
All the components expose different types of interfaces in order to cover nonfunctional requirements, such as scalability, modularity and replaceability. Nevertheless, some of them are more coupled than others, since they work to provide features together.
- The REST Workflow, Explorer Workflow and Core Workflow Engine components are working jointly in order to arrange the workflow execution. Therefore, it is possible to replace these components with implementations such as Camunda or BonitaSoft; and re-implementing the adaptation and extension developed in these components based on Activiti.
- The Editor Workflow is partially independent of the base line workflow engine as its main duty is to create the executable workflow to be deployed in the specific engine, which might include concrete extensions on the standard BPMN. In this sense, this component could also be extended in order to work for other workflow engines. In addition, it could also be replaced by another workflow editing component which could be coupled to a specific workflow engine like Activiti or the one which totally replaces the agglomeration of the previously referred components in the previous bullet.
- The Parser Worflow Manager and Bind Proxy have isolated functionalities and expose a Restful interface. Hence, it is feasible to substitute them by other components, if they maintain the exposed APIs.
- Finally, the Workflow Engine use a persistence framework with support for custom SQL, stored procedures and advanced mappings, this allow to substitute the Workflow Data Base module by other relational databases as long as the new option follows the standard connectors, since this persistence framework creates an abstract layer between the entities and their persistence in the data base.
Installation manual
The component is developed in java based on Activiti 5.18; several frameworks are used such as Vaadin, Spring and mybatis. A MySQL database is used.
As a build automation tool, the components have used Maven, which describes how they are built, and their dependencies. This allows building and generating automatically the artifacts for the different environments (development and production) and their configuration for example with Eclipse. Besides, the use of this artifact will facilitate the continuous integration, which will be covered in Task T4.5 CloudSocket Integration and Consolidation.
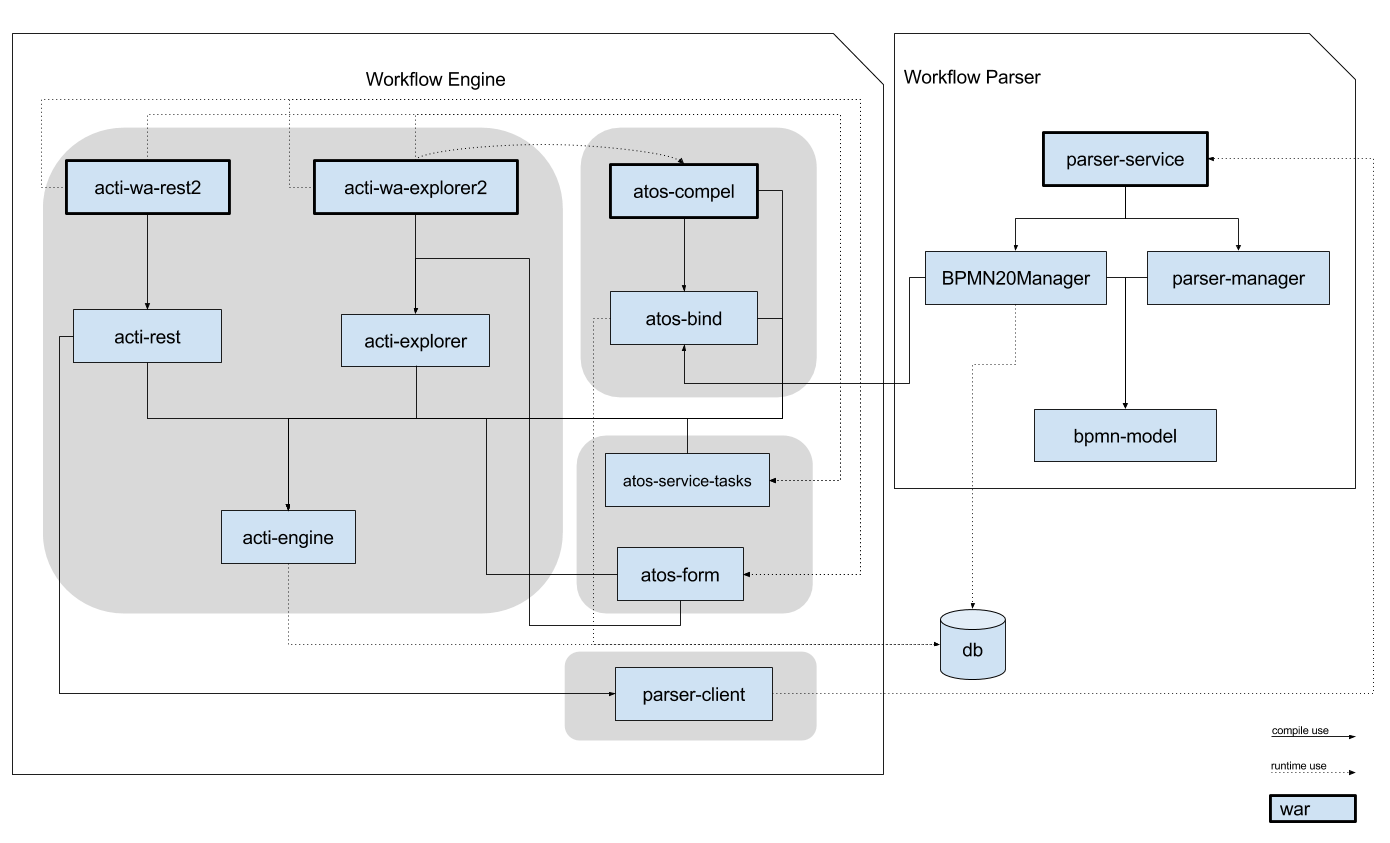
The installation manual takes advantage of these tools, facilitating the installation at the different environments and describing the necessary steps to install the component and its modules. The following figure indicates the generated artefacts and their dependencies.

Figure - Artefacts of the Workflow Engine
Development
Requirements
- Oracle JDK 1.7.x
- Tomcat 7.x
- Maven tool for building applications.
Installation Download source code. The workflow engine comprises two projects:
- Workflow Parser: https://omi-gitlab.e-technik.uni-ulm.de/cloudsocket/workflow-parser.
- Components:
- parser-service is the war package that exposes the API web (WS/REST)
- parser-manager is responsible for managing the deployment and execution adaptations in order to obtain the appropiated BPMN2.0 file
- BPMN20Manager is responsible for generating the automatic code, which will be included in the BPMN 2.0 file, to call WS. It will be integrated into the parser-manager component.
- bpmn-model is the bpmn model that allows to manage and modify the BPM2.0 files following the standar.
- parser-client is the proxy to call the interfaces, exposed in the parser-service component. This can be used by other applications or components in order to call the workflow parser.
- Components:
- Workflow Engine: https://omi-gitlab.e-technik.uni-ulm.de/cloudsocket/workflow-engine
- Components Activiti v5.18 (customized/modified):
- activiti-webapp-rest2 is the war package that exposes the API REST of Activiti. It has been customized to cover the deployment and execution adaptations actions.
- activiti-webapp-explorer2 is the war package that exposes the GUI of Activiti. It has been customized to manage the different functionalitis such as integration Idm, multi-tenant approach, introduction of tokens and groups....
- activiti-rest is the component that execute the actions of the activiti-webapp-rest2. It has been modied to cover the actions of the activiti-webapp-rest2 component.
- activiti-explorer is the component that execute the actions of the activiti-webapp-explorer2. It has been modied to cover the actions of the activiti-webapp-explorer2.
- activiti-engine is the core of the engine. It has been modified to cover our functionalities.
- Rest of components:
- atos-compel is responsible for discovering and binding the services (atomic services, software components...) with the service tasks included in the business process. It wraps the BPMN web editor and store the binding into the data base.
- atos-bind is responsible for storing the binding and the tokens in the data base. it can be used by other components to access and manage the data of the system.
- atos-service-tasks manages the different kind of service tasks such as the RESTproxy (which invokes remote services), monitoring service tasks (which allow to send monitoring data)
- atos-form manages the different kind of fields that can be included in the user tasks in the business process.
- demo-app is responsible for providing the different atomic services and software components, which have been used in the BPaaS bundles.
- Components Activiti v5.18 (customized/modified):
- Create the necessary artifacs executing the following instruction for all of components:
( cd workflow-parser && mvn install )
( cd workflow-engine && bin/bootstrap.sh && mvn install )
- Copy the war file generated in the WorkflowEngineService, activiti-webapp-rest2 and emo-app modules into the webapps folder Tomcat.
<modulePath>/target
Development environment
- Create the eclipse project executing the following instruction for all necessary components:
mvn eclipse:eclipse
Production
Requirements
- OpenJDK 1.7.x
- MySql 5.5.x
- Tomcat 7.x
- Nginx
Installation
- Validate that the version of Java is the correct one, if not install the version
#java -version
java version "1.7.0_85"
- Install the requeriments
sudo aptitude install mysql-server
sudo aptitude install tomcat7
sudo aptitude install nginx
- Configure the schema and user of the Activiti (the password of the root has been introduced during the MySql installation).
mysql -h localhost -u root -p
create database activiti_cloudsocket;
create user cloudsocket@localhost identified by 'cloudsocket';
grant all privileges on activiti_cloudsocket.* to cloudsocket@localhost;
- Configure the modules of Tomcat (if you want to change the default password). Modify the file "<activiti-webapp-rest2>/WEB-INF/classes/db.properties" and "<activiti-webapp-explorer2>/WEB-INF/classes/db.properties" in order to introduce the new password.
db=mysql
jdbc.driver=com.mysql.jdbc.Driver
jdbc.url=jdbc:mysql://localhost:3306/activiti_cloudsocket
jdbc.username=cloudsocket
jdbc.password=cloudsocket
- Configure the Nginx to redirect the 80 --> 8080. Modify the file (/etc/nginx/sites-available)
server { listen 0.0.0.0:80; server_name localhost 134.60.64.132; client_max_body_size 4G; access_log /var/log/nginx/workflow_Engine.access.log; error_log /var/log/nginx/workflow_Engine.error.log; location /demo-app-1.0/ { # an HTTP header important enough to have its own Wikipedia entry: # http://en.wikipedia.org/wiki/X-Forwarded-For proxy_set_header X-Forwarded-For $proxy_add_x_forwarded_for; # enable this if and only if you use HTTPS, this helps Rack # set the proper protocol for doing redirects: # proxy_set_header X-Forwarded-Proto https; # pass the Host: header from the client right along so redirects # can be set properly within the Rack application proxy_set_header Host $http_host; # we don't want nginx trying to do something clever with # redirects, we set the Host: header above already. proxy_redirect off; proxy_pass http://localhost:8080/demo-app-1.0/; } location /activiti-webapp-rest2/ { # an HTTP header important enough to have its own Wikipedia entry: # http://en.wikipedia.org/wiki/X-Forwarded-For proxy_set_header X-Forwarded-For $proxy_add_x_forwarded_for; # enable this if and only if you use HTTPS, this helps Rack # set the proper protocol for doing redirects: # proxy_set_header X-Forwarded-Proto https; # pass the Host: header from the client right along so redirects # can be set properly within the Rack application proxy_set_header Host $http_host; # we don't want nginx trying to do something clever with # redirects, we set the Host: header above already. proxy_redirect off; proxy_pass http://localhost:8080/activiti-webapp-rest2/; } location /activiti-webapp-explorer2/ { # an HTTP header important enough to have its own Wikipedia entry: # http://en.wikipedia.org/wiki/X-Forwarded-For proxy_set_header X-Forwarded-For $proxy_add_x_forwarded_for; # enable this if and only if you use HTTPS, this helps Rack # set the proper protocol for doing redirects: # proxy_set_header X-Forwarded-Proto https; # pass the Host: header from the client right along so redirects # can be set properly within the Rack application proxy_set_header Host $http_host; # we don't want nginx trying to do something clever with # redirects, we set the Host: header above already. proxy_redirect off; proxy_pass http://localhost:8080/activiti-webapp-explorer2/; } } - Locate the war artifacts at the server:
- WorkflowEngineService
- activiti-webapp-rest2
- activiti-webapp-explorer2
- demo-app
- Copy the war to the the tomcat folder (/var/lib/tomcat7/webapps)
sudo cp * /var/lib/tomcat7/webapps
- Test the installation. Open a Navigator and test the following URLs:
http://134.60.64.132/demo-app-1.0/services/
http://134.60.64.132/activiti-webapp-explorer2/
http://134.60.64.132/activiti-webapp-rest2/service/repository/deployments (basic authentication:kermit/kermit)
Test Cases
To execute the unit tests, we need to install the tool curl http://curl.haxx.se/ Optional: if you want to see the formatted response, the python library can be used. If not, you only need to remove this part: “| python -mjson.tool” of the command.
- Create a new deployement:
It is needed to execute the following command:
curl -X POST -F "file=@testCloudsocket.bpmn20.xml" -F "tenantId=ATOS" -F "endPointServiceList={\"workFlowId\":\"wf1\",\"endPointServices\":[{\"serviceId\":\"http://localhost:8080/demo-app-1.0/services/cardDesigner?wsdl\",\"serviceTaskId\":\"\",\"type\":\"WS\",\"ip\":\"127.0.0.1:8080\"},{\"serviceId\":\"http://localhost:8080/demo-app-1.0/services/email?wsdl\",\"serviceTaskId\":\"\",\"type\":\"WS\",\"ip\":\"127.0.0.1:8080\"}]}" --user kermit:kermit -H "content-type: multipart/form-data" http:// 134.60.64.132/activiti-webapp-rest2/service/repository/deployments | python -mjson.tool
Where the attributes are:
- File is the bpm2.0 file (testCloudsocket.bpmn20.xml)
- TenantId is the tenant of the organization (for the moment it is not used).
- endPointServiceList is the list of the actual IP for the two services.
Success response { "category": null, "deploymentTime": "2015-10-27T22:00:45.161Z", "id": "40", "name": "testCloudsocket.bpmn20.xml", "tenantId": "ATOS", "url": "http://134.60.64.132/activiti-webapp-rest2/service/repository/deployments/40" } - Detail of the deployement
curl --user kermit:kermit  http:// 134.60.64.132/activiti-webapp-rest2/service/repository/deployments/{deploymentId} | python -mjson.tool
in our case deploymentId is 40:
curl --user kermit:kermit http://134.60.64.132/activiti-webapp-rest2/service/repository/deployments/40 | python -mjson.tool
The description appears for your deployment.
{
    "category": null,
    "deploymentTime": "2015-10-30T15:21:42.711+01:00",
    "id": "40",
    "name": "testCloudsocket.bpmn20.xml",
    "tenantId": "ATOS",
    "url": "http://127.0.0.1:8080/activiti-rest/service/repository/deployments/40"
}
- List of resources associated
curl --user kermit:kermit http://134.60.64.132/activiti-webapp-rest2/service/repository/deployments/{deploymentId}/resources | python -mjson.tool
in our case deploymentId is 40:
curl --user kermit:kermit http://134.60.64.132/activiti-webapp-rest2/service/repository/deployments/40/resources | python -mjson.tool
List of resources appears.
[
    {
        "contentUrl": "http://134.60.64.132/activiti-webapp-rest2/service/repository/deployments/40/resourcedata/testCloudsocket.bpmn20.xml",
        "id": "testCloudsocket.bpmn20.xml",
        "mediaType": "text/xml",
        "type": "processDefinition",
        "url": "http://134.60.64.132/activiti-webapp-rest2/service/repository/deployments/40/resources/testCloudsocket.bpmn20.xml"
    },
    {
        "contentUrl": "http://134.60.64.132/activiti-webapp-rest2/service/repository/deployments/40/resourcedata/testCloudsocket.testCloudsocket.png",
        "id": "testCloudsocket.testCloudsocket.png",
        "mediaType": "image/png",
        "type": "resource",
        "url": "http://134.60.64.132/activiti-webapp-rest2/service/repository/deployments/40/resources/testCloudsocket.testCloudsocket.png"
    }
]
- Get the associated resource
curl --user kermit:kermit http://134.60.64.132/activiti-webapp-rest2/service/repository/deployments/{deploymentId}/resourcedata/testCloudsocket.bpmn20.xml
In our case deploymentId is the id 40:
curl --user kermit:kermit http://134.60.64.132/activiti-webapp-rest2/service/repository/deployments/40/resourcedata/testCloudsocket.bpmn20.xml
The BPMN file associated to our deployment:
<?xml version='1.0' encoding='UTF-8'?>
<definitions xmlns="http://www.omg.org/spec/BPMN/20100524/MODEL" xmlns:xsi="http://www.w3.org/2001/XMLSchema-instance" xmlns:xsd="http://www.w3.org/2001/XMLSchema" xmlns:activiti="http://activiti.org/bpmn" xmlns:bpmndi="http://www.omg.org/spec/BPMN/20100524/DI" xmlns:omgdc="http://www.omg.org/spec/DD/20100524/DC" xmlns:omgdi="http://www.omg.org/spec/DD/20100524/DI" typeLanguage="http://www.w3.org/2001/XMLSchema" expressionLanguage="http://www.w3.org/1999/XPath" targetNamespace="http://www.activiti.org/processdef">
  <import namespace="http://demo.seiplab.atosresearch.eu/" location="http://http://127.0.0.1:8080/demo-app-1.0/services/cardDesigner?wsdl" importType="http://schemas.xmlsoap.org/wsdl/"/>
  <import namespace="http://demo.seiplab.atosresearch.eu/" location="http://http://127.0.0.1:8080/demo-app-1.0/services/email?wsdl" importType="http://schemas.xmlsoap.org/wsdl/"/>
  <process id="testCloudsocket" name="testCloudsocket" isExecutable="true">
    <userTask id="sid-9956FEED-377C-4C6D-81F5-1DF14EE36D56" name="test" activiti:candidateGroups="sales"/>
    <startEvent id="sid-AD365612-18DE-48F1-971F-944E51AB8804"/>
    <endEvent id="sid-F9B53F7F-5822-4653-BA91-CA88B3A026D3"/>
    <sequenceFlow id="sid-685E0C22-D2AD-4DF4-96C6-A435792C214A" sourceRef="sid-AD365612-18DE-48F1-971F-944E51AB8804" targetRef="sid-9956FEED-377C-4C6D-81F5-1DF14EE36D56"/>
    <sequenceFlow id="sid-541CE92A-8C33-4041-9359-693F38333D2F" sourceRef="sid-9956FEED-377C-4C6D-81F5-1DF14EE36D56" targetRef="sid-F9B53F7F-5822-4653-BA91-CA88B3A026D3"/>
  </process>
  <bpmndi:BPMNDiagram id="BPMNDiagram_testCloudsocket">
    <bpmndi:BPMNPlane bpmnElement="testCloudsocket" id="BPMNPlane_testCloudsocket">
      <bpmndi:BPMNShape bpmnElement="sid-9956FEED-377C-4C6D-81F5-1DF14EE36D56" id="BPMNShape_sid-9956FEED-377C-4C6D-81F5-1DF14EE36D56">
        <omgdc:Bounds height="80.0" width="100.0" x="315.0" y="163.0"/>
      </bpmndi:BPMNShape>
      <bpmndi:BPMNShape bpmnElement="sid-AD365612-18DE-48F1-971F-944E51AB8804" id="BPMNShape_sid-AD365612-18DE-48F1-971F-944E51AB8804">
        <omgdc:Bounds height="30.0" width="30.0" x="136.45001220703125" y="184.0"/>
      </bpmndi:BPMNShape>
      <bpmndi:BPMNShape bpmnElement="sid-F9B53F7F-5822-4653-BA91-CA88B3A026D3" id="BPMNShape_sid-F9B53F7F-5822-4653-BA91-CA88B3A026D3">
        <omgdc:Bounds height="28.0" width="28.0" x="575.4500122070312" y="189.0"/>
      </bpmndi:BPMNShape>
      <bpmndi:BPMNEdge bpmnElement="sid-541CE92A-8C33-4041-9359-693F38333D2F" id="BPMNEdge_sid-541CE92A-8C33-4041-9359-693F38333D2F">
        <omgdi:waypoint x="415.0" y="203.0"/>
        <omgdi:waypoint x="575.4500122070312" y="203.0"/>
      </bpmndi:BPMNEdge>
      <bpmndi:BPMNEdge bpmnElement="sid-685E0C22-D2AD-4DF4-96C6-A435792C214A" id="BPMNEdge_sid-685E0C22-D2AD-4DF4-96C6-A435792C214A">
        <omgdi:waypoint x="166.44738152787627" y="199.2809153861509"/>
        <omgdi:waypoint x="315.0" y="202.06345112885748"/>
      </bpmndi:BPMNEdge>
    </bpmndi:BPMNPlane>
  </bpmndi:BPMNDiagram>
</definitions>
- Delete the deploment
curl -X DELETE --user kermit:kermit http://127.0.0.1:8080/activiti-rest/service/repository/deployments/40


